
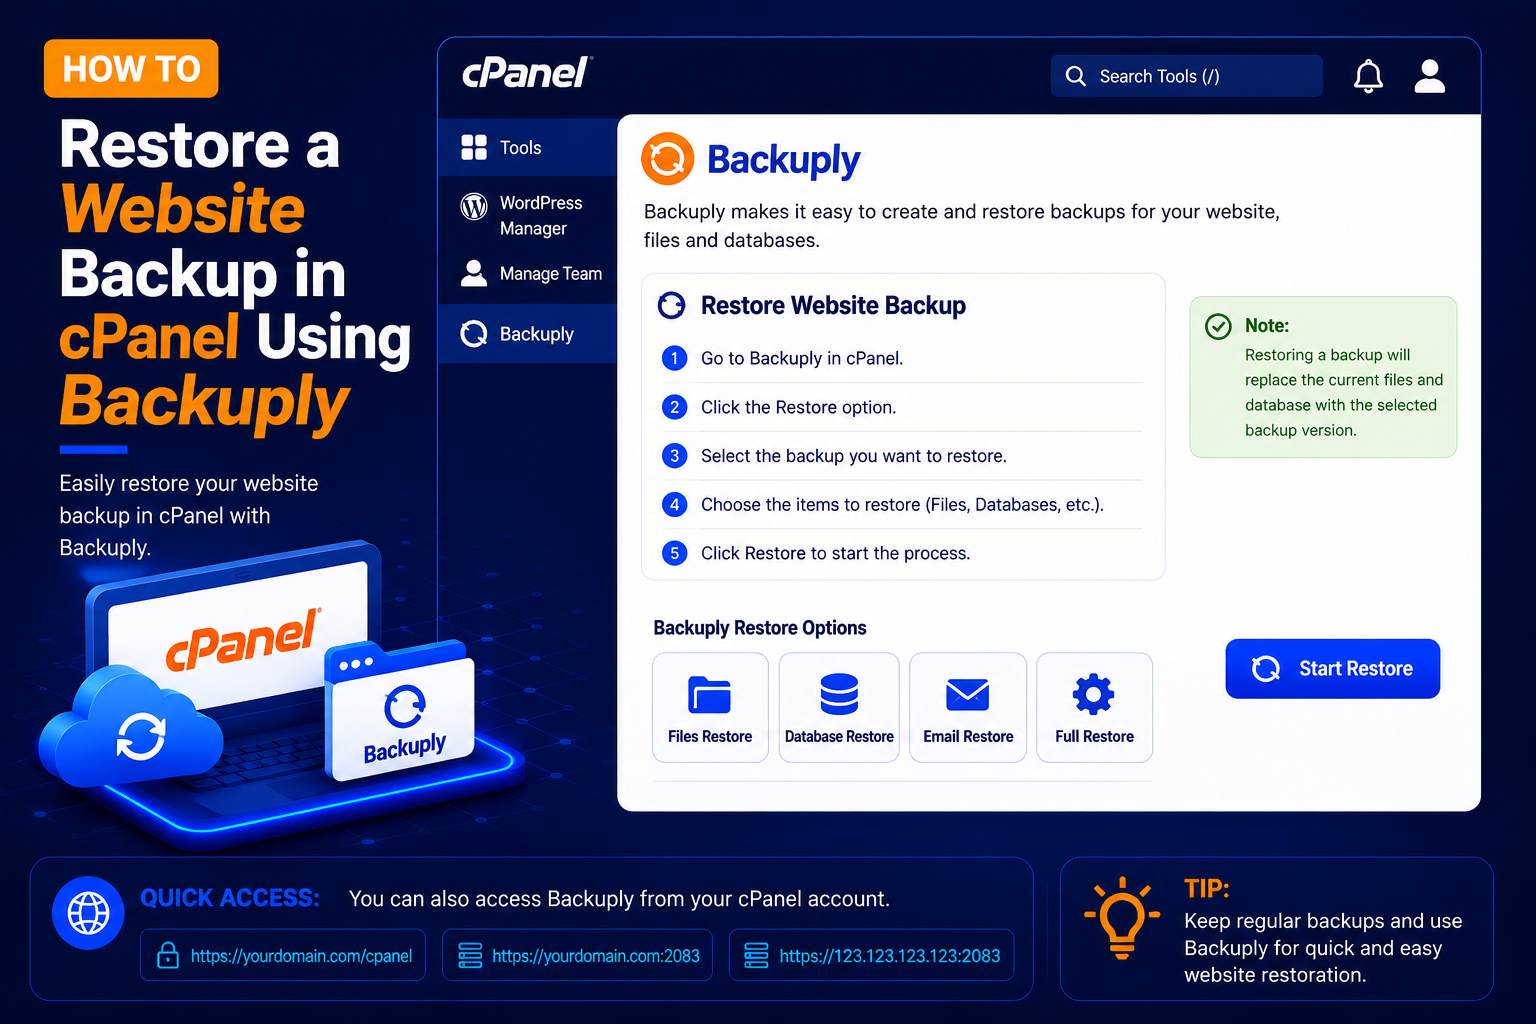
How to Restore a Website Backup in cPanel Using Backuply
Website backups are essential when you need to recover from accidental file deletion, website errors, failed updates, malware cleanup, or other problems.
If your hosting provider has Backuply enabled in cPanel, you may be able to view available backups and restore website data directly from your cPanel account.
Note: Backuply features and restore options can vary depending on your hosting provider’s configuration and your hosting plan. The buttons and options you see may be slightly different from the examples in this guide.
Before Restoring Your Website
Before starting a restoration, check the current website and determine what needs to be restored.
Depending on the available Backuply options, you may be able to restore:
- Website files
- MySQL databases
- Email data
- DNS or other account data
- A larger account backup
Restoring an older backup can overwrite newer website data. If possible, create a backup of the current website before proceeding.
It also helps to write down when the problem started. Knowing that your site broke after a plugin update on a particular afternoon makes it much easier to pick the right restore point. If new orders, form entries or blog comments arrived after that time, export or note them first, because they will not exist in an older backup.
How to Restore a Backup Using Backuply
Step 1: Log in to cPanel
- Open your cPanel login page, usually
https://yourdomain.com/cpanelorhttps://yourdomain.com:2083. - Enter your cPanel Username and Password, then click Log in.
Step 2: Find Backuply
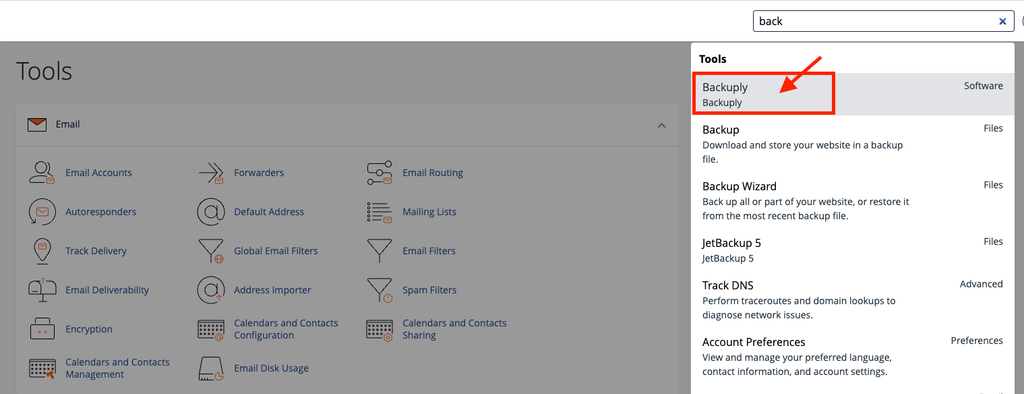
- After logging in to cPanel, use the search bar and search for: Backuply
- If Backuply is enabled on your hosting account, its icon should appear in cPanel.
- Click Backuply to open the backup management interface.
Step 3: Open the Backuply Dashboard
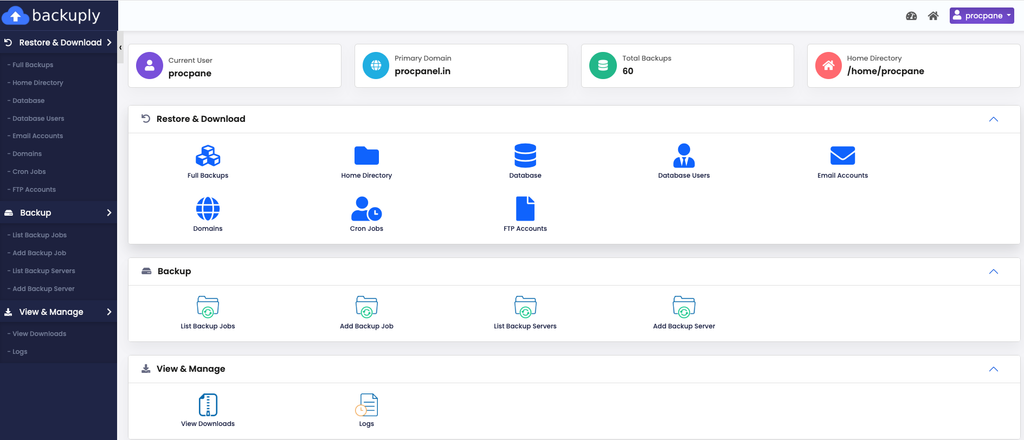
- After opening Backuply, you should see the Backuply dashboard.
- Depending on your hosting provider’s configuration, this area may show available backups, backup locations, schedules, or restore options.
Step 4: Open the Backups Section
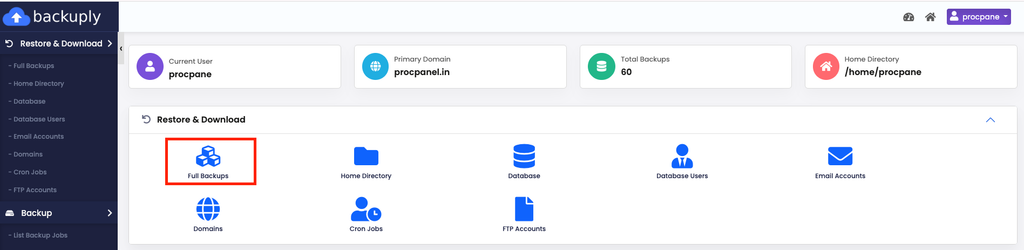
- Navigate to the section that displays your available backups.
- Look for an option such as: Backups
- You should see the backups available for your hosting account.
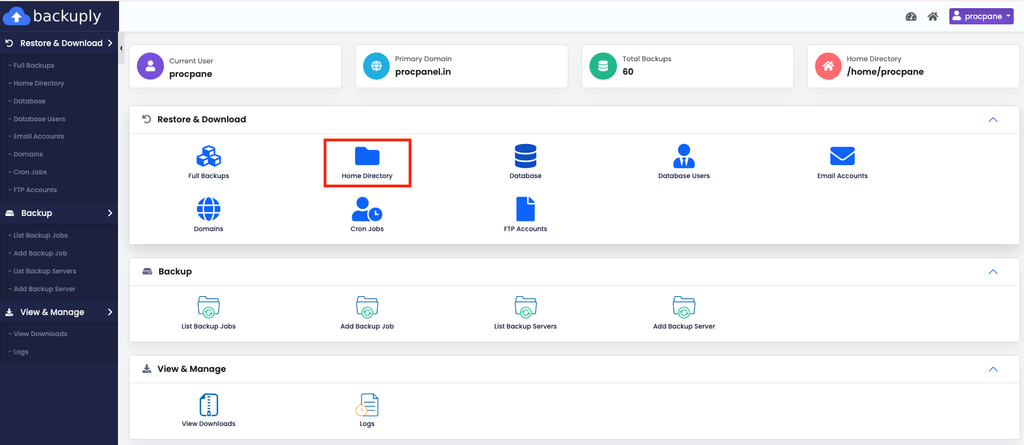
Note: If you are using Backuply in cPanel, you may see different backup options, including Full Backup and Home Directory Backup. Although they may look similar, they are intended for different purposes.
Understanding Backuply Backup Types
What Is Backuply?
Backuply is a backup and restoration solution that can be integrated with hosting control panels such as cPanel.
Depending on the configuration provided by your hosting company, Backuply can be used to back up and restore website files, databases, emails, and other hosting account data.
What Is a Full Backup?
A Full Backup is intended to provide a more complete backup of your hosting account.
Depending on your hosting provider’s Backuply configuration, a full backup may contain:
- Website files
- MySQL databases
- Email data
- Home directory files
- Website configuration files
- Other supported cPanel account data
A Full Backup is generally the better choice when you need broader account recovery rather than restoring only a few website files.
When Should You Use a Full Backup?
A Full Backup can be useful when:
- You need to recover an entire hosting account.
- Multiple websites or databases have been affected.
- You are preparing for a major website or server change.
- You want a more complete recovery point.
- You need to migrate or restore a large amount of account data.
Always check what your hosting provider includes in its Backuply Full Backup before relying on it for account recovery.
What Is a Home Directory Backup?
- A Home Directory Backup focuses on files and folders stored within your hosting account’s home directory.
- For example, your WordPress website files may be stored under: public_html/
- A Home Directory backup may therefore contain files such as:
public_html/
├── wp-admin/
├── wp-content/
├── wp-includes/
├── wp-config.php
└── index.php - It may also contain other files and directories located within your account’s home directory.
Keep in mind that a WordPress website needs both its files and its database. If a home directory restore brings back your files but the problem is in the content or settings, you may also need to restore the matching database, if your Backuply setup offers that option.
Choosing and Running the Restore
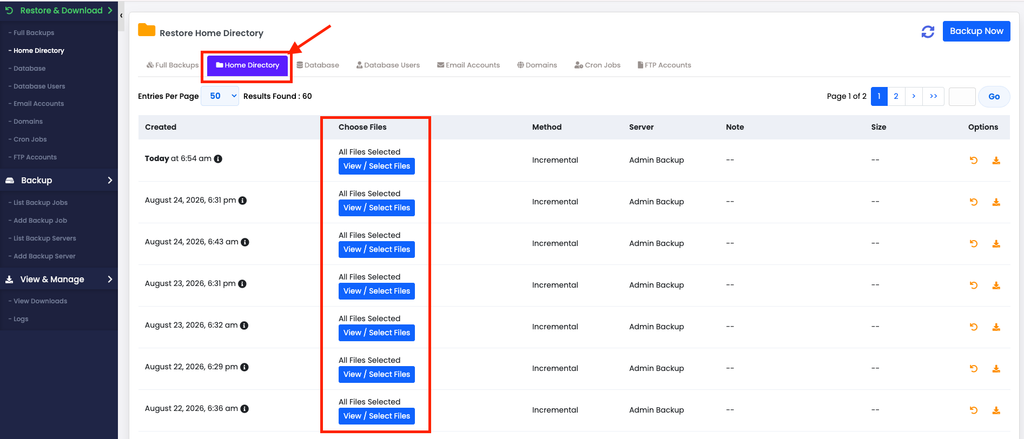
Step 5: Select a Backup Date
- Review the available backup dates and select the backup created before the website problem occurred.
- For example, if your website stopped working today after an update, you might choose a backup from the previous day when the website was working correctly.
- Choose the restore point carefully because any changes made after that backup was created may not be included.
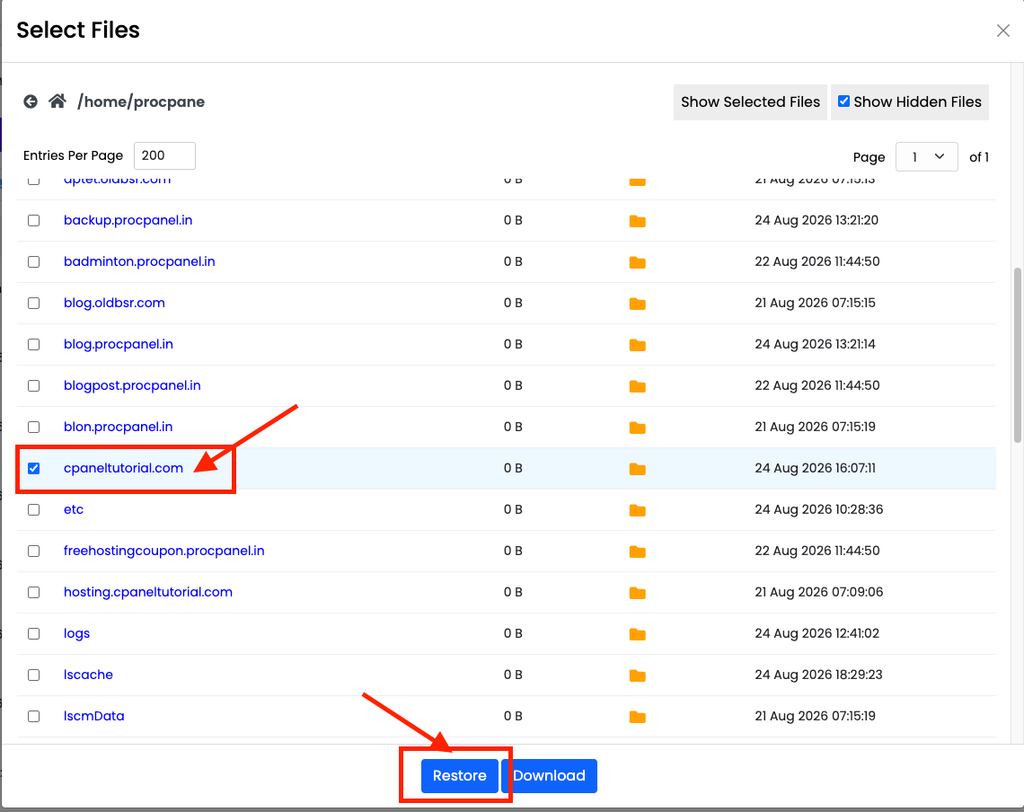
Step 6: Click the Restore Option
- After selecting the required backup, locate the available Restore option.
- Click it to view the restoration options provided for that backup.
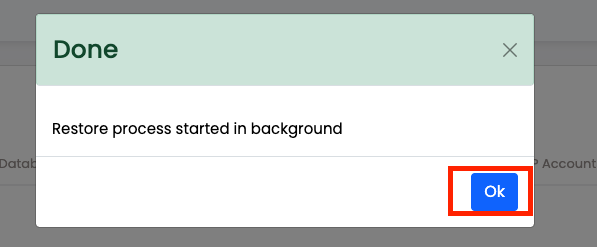
Step 7: Restore Process Started in the Background
- After starting the restore in Backuply, you will see a confirmation message:
- “Restore process started in background”
- This means Backuply has successfully accepted your restore request and the restoration process is now running in the background.
- Click OK to close the confirmation window.
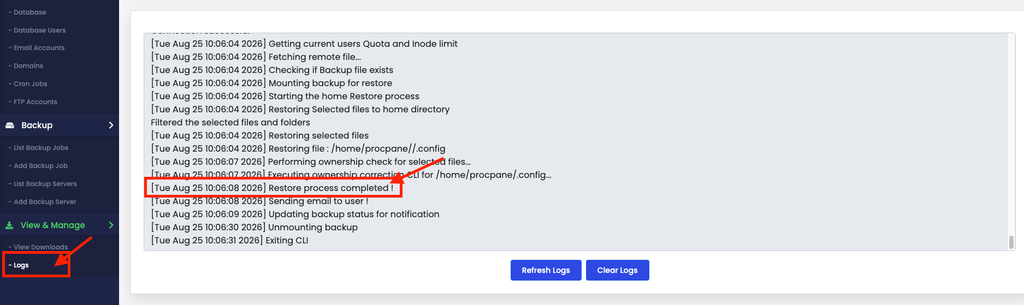
Step 8: Check the Restore Status in Backuply Logs
- To check whether the restoration has completed, go to:
- Backuply → View & Manage → Logs
- The logs display the progress of the restore process, including fetching the backup, mounting the backup, restoring the selected files, and performing ownership checks.
- Click Refresh Logs if you want to see the latest restore status.
- When you see the following message:
- “Restore process completed!”
- it confirms that the selected files have been successfully restored.
After the restore is complete, check your website and restored files to make sure everything is working correctly.
Common Problems and How to Fix Them
Backuply does not appear in cPanel
Backuply is an optional tool that your hosting provider must install and enable. If searching for it shows nothing, your host may use a different backup system, such as the standard cPanel Backup tool or JetBackup. Contact support to ask how backups are provided on your plan.
The restore seems stuck
Large accounts can take a long time to restore because the backup has to be fetched from remote storage first. Wait, then click Refresh Logs. Avoid starting a second restore of the same data while one is still running.
The website still shows the old error after restoring
Clear your browser cache and any caching plugin or CDN cache. Make sure you picked a backup from before the problem started, and that you restored the database as well as the files if the issue was in the content or settings.
Permission or ownership errors after restore
Backuply performs ownership checks during the restore, but if you still see “403 Forbidden” or permission errors, check that folders are typically set to 755 and files to 644 in File Manager, or ask your host to fix ownership.
Tips and Best Practices
- Take a fresh backup of the current site before restoring, so you can go back if you pick the wrong date.
- Restore only what you need. If one folder was deleted, restoring that folder is safer than restoring the whole account.
- Keep your own off-server copy of important backups, for example with a plugin such as UpdraftPlus or a manual database export.
- Test the website thoroughly after restoring: log in, open key pages, and submit a test form.
- Note how long your host keeps backups so you know how far back you can go.
Frequently Asked Questions
Will restoring a backup delete my new content?
It can. Restoring replaces the selected data with the version from the backup date, so anything added after that date may be lost for the data you restore.
Can I restore only my database?
If your host enables database restores in Backuply, you can select only the database. Otherwise, you can restore a database manually with phpMyAdmin using an SQL file.
How long does a restore take?
It depends on the size of the backup and where it is stored. Small file restores can finish in minutes, while full account restores can take much longer.
Conclusion
Backuply makes recovery straightforward: open it from cPanel, choose the correct backup type and date, start the restore, and watch the logs until you see “Restore process completed!”. Take a current backup first, restore only what you need, and test your site afterwards for a smooth recovery.